Wondering why your Audio is not syncing with the video? Worried that your video file is damaged or corrupt? Worry no more; this article talks about everything related to audio and video out of sync issues and methods to fix the same. However, if you want to resolve the issue in no time and get your video back to normalcy, then try using the Yodot Video Repair Software.


What is an Audio and Video Out of Sync Issue?
Audio Video sync refers to the relative timing of Audio and video. Sometimes there will be an issue in Audio/video while playing, i.e., Audio and video will not be synchronized while playing MP4, AVI, or any video format.
Audio not syncing with video is an error you can see while the video is playing correctly and the Audio is lagging. Audio-video sync issue is common across all video file types. It can occur anytime, irrespective of the device you are using.
Audio video sync issue happens mainly due to outdated media players, damaged or corrupted video files, playing the video in an unsupported media player, malware issues, etc. There is a solution for every problem; here in this article, we explained what caused this error and the methods of how to sync Audio and video. Follow along to fix this issue and get alleviate the problem.
Table of Contents:
Understanding Why Audio and Video Out-of-Sync Issues Occurred
Understanding Why Audio and Video Out-of-Sync Issues Occurred
Now that we got to know what is Audio and video out of sync let’s understand the major causes:
Delay in Processing:
While recording or editing, the Audio, and the video go into various processing delays; due to this, Audio and video out-of-sync issues might occur.
Issues in Hardware:
If there is a hardware error, you will face an audio video out of sync issue. So make sure that your Hardware is up to date.
Compression:
There will be data in the Audio or video. While compressing the data may be compressed at different rates, this leads to Audio not sync with video error.
Issues in the Network:
Network issues are common; this is a possible cause of the problem. For example, when you transfer an audio-video file via the network, a delay can happen because of network congestion or buffering.
Error Occurred While Editing:
You have to be conscious while editing small mistake that leads to Audio and video out-of-sync errors. Editing with a third-party tool or if you are a beginner in editing, this issue may happen.
Quick DIY Solutions to fix Audio Video Sync Issue
Here are the quick solutions to fix Audio/Video out of sync on windows and mac
Stable Internet Connection:
An unstable internet connection might harm your video streaming experience by showing audio-video sync issues. Fix the problem and continue watching your favorite video.
Try Playing Videos on Other Browsers:
Clearing the cache on your browser might help you play the video file without hassle. If this doesn’t help, try playing your video on another browser.
Use Video Editing Software to Resynchronize:
Make use of the video editing software to manually fix the audio-video sync issue by dividing the Audio and video separately. And match the Audio with the video by simply dragging the Audio forward or backward.
Delay Plugin:
Using a delay plugin, you can manually change the audio timings. To use this plugin, you should use Digital Audio Workstation, attach the plugin to the audio track, and ensure that the Audio matches the video.
Audio Playing Rate:
The Audio playing rate is the leading cause of not syncing with the video issue. The video we are watching will probably be high resolution(high quality), so it will take more time to process a video signal than an audio signal. So, only the Audio is playing before the video, and we face audio-video sync issues. Try playing the video file on a compatible device or following the above DIY methods to fix this.
Methods to Sync Audio and Video on Windows and Mac
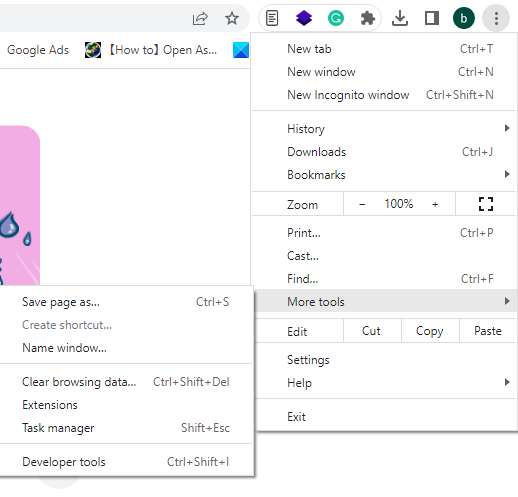
Method 1: How to Sync Audio and Video by Clearing the Site Cache
- Open Chrome on your PC and right-click on More tools
- Select clear browsing data
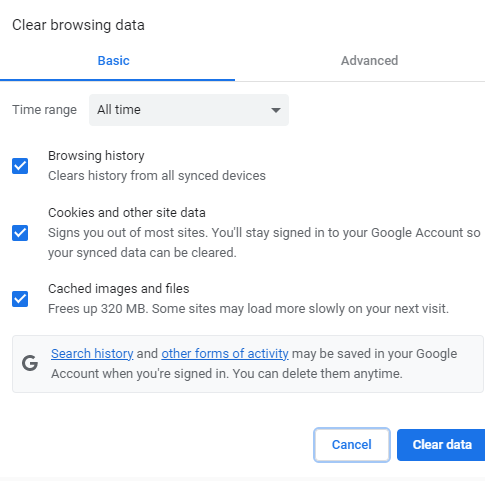
- Now, select the time range to delete the data
- Select the check box cookies and other site data and cached images and files
- Click on clear data
Method 2: Use Audio Troubleshooter
- Open troubleshooter
- Choose Additional troubleshooter
- Click on Playing Audio
- Now Run the troubleshooter
Method 3: Changing Video Frame Rate to Standard Frame Rate
VLC player is one of the most used media players around the globe because of its various file-type support feature. It supports almost all file types, including MOV, MP4, AVI, WMV, MPEG, etc. Follow the steps on how to change the video frame rate to the standard frame rate:
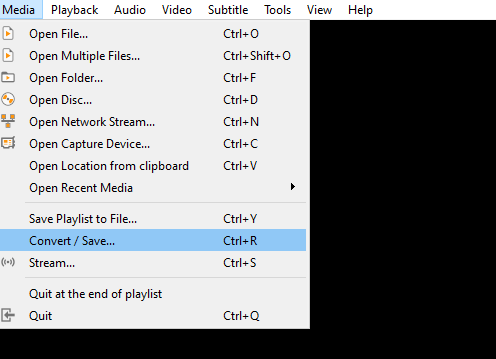
Step 1: Launch the VLC media player and click Media → Convert/save it will show the Open Media dialog box.
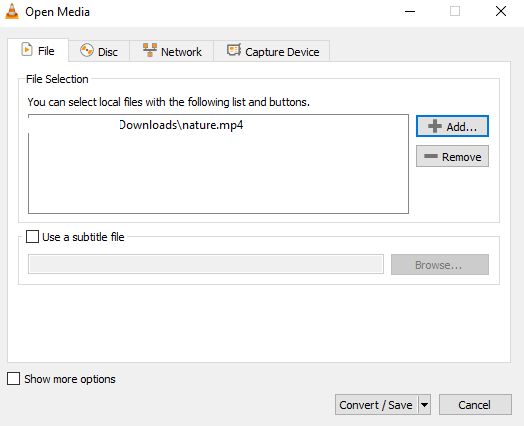
Step 2: Select Add and a file dialog box will appear. First, go to the file where you want to change the frame rate. Please open the file in the File Selection list by double-clicking on it.
Step 3: Select the Convert/Save → Convert and click on the Edit button, which will be in the form of a screwdriver icon
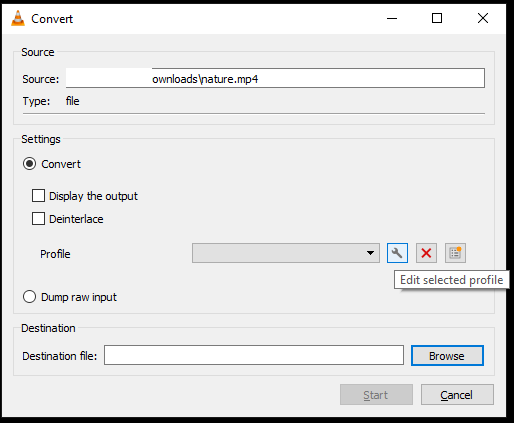
Step 4: Choose the Video Codec tab. If you decide to keep the original sound, click the check mark showing Keep Original Video Track. Then, select 1 from Scale so you can keep the original frame size.
Step 5: Give a Frame Rate of 30 frames per second and a bitrate of 100 kilobytes per second; click on Save to go to the Convert dialog box.
Step 6: Click Browse to give a converted file’s location and name. Then, with the help of Profile, select the file type for the converted file and select Start to convert the file.
Method 4: How to Sync Audio and Video by Mac iMovie
iMovie is an effective video editing tool developed by apple; it supports every device of apple like mac, iPhone, and iPad. It has the most incredible feature like color correction and image stabilization. It can correct your audio and video issues also. Refer to the steps section on how to sync Audio and video by mac Imovie.
You can sync Audio and video using iMovie in two ways:
- Editing the Audio by extracting it
- Adding external Audio to video with iMovie
- Editing the Audio by extracting it
iMovie has a unique feature as you can remove the Audio and video separately and do whatever editing you want. Follow the below steps on how to do it.
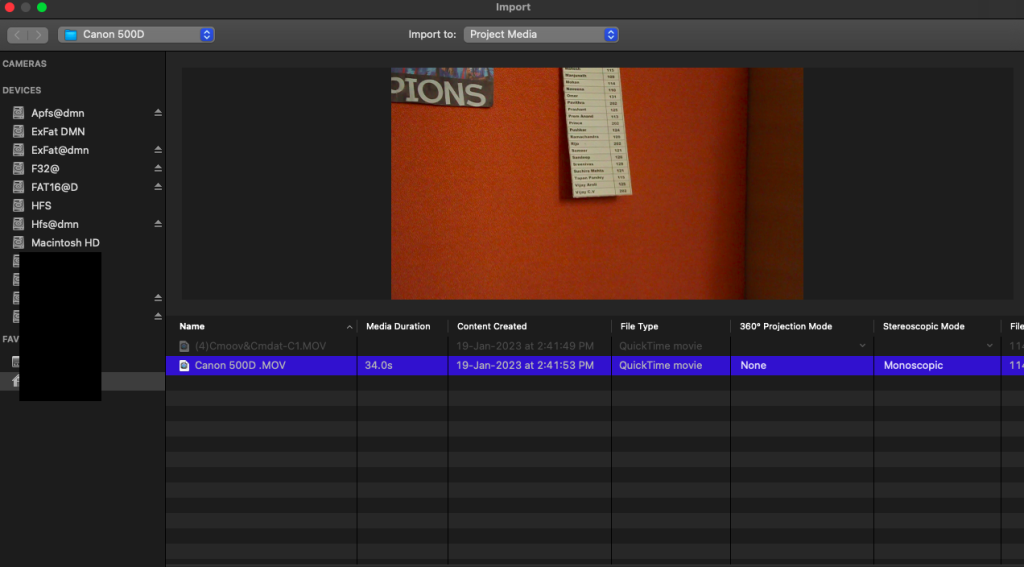
- Launch iMovie and select File, which is available in the Menu bar and import the video you want to edit by clicking Import Media.
- Drag the file from My Media to My Clips.
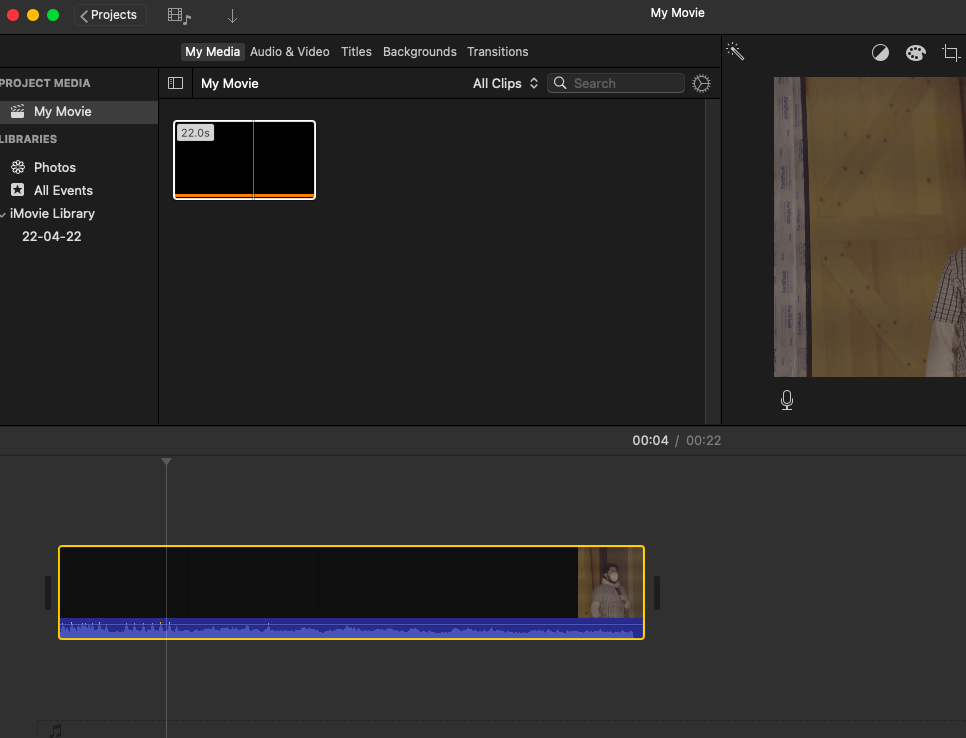
- Choose Detach Audio from Modify menu.

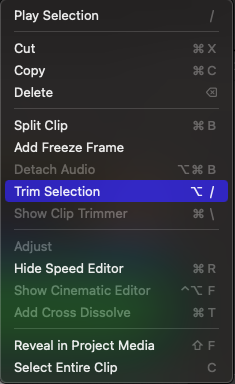
- Later select Audio File → Edit, then click Trim to Selection and move it depending on the video size.
- Finally, select File and click on Save.
2. Adding external Audio to video with iMovie
Follow the steps given below for adding external Audio to video with iMovie
- Open the video which you want to sync on iMovie.
- Take the Audio and video file to the iMovie timeline
- Now select the video, and to remove the Audio, you have to disable the Speaker option
- To sync the Audio with the video, add the removed Audio back to the timeline and sync it to the video
- And at last select Share and Export File to save.
Method 5: Fix Using the VLC Media Player
Fix Audio and video out-of-sync issues using a VLC media player with the three fixes.
Fix 1: Fix Audio not Sync With Video Issue for Windows and Mac Using Keyboard Shortcut Keys.
For Windows:
Play the video that is having the sync issue in the VLC Media Player. If the Audio plays before the video, correct it by clicking the K key. If it plays after the video, fix it by clicking the J key.
For Mac:
Select the G key to slow the Audio and fix it properly to the respective video. Click the F key to boost the audio speed to match the video playing speed.
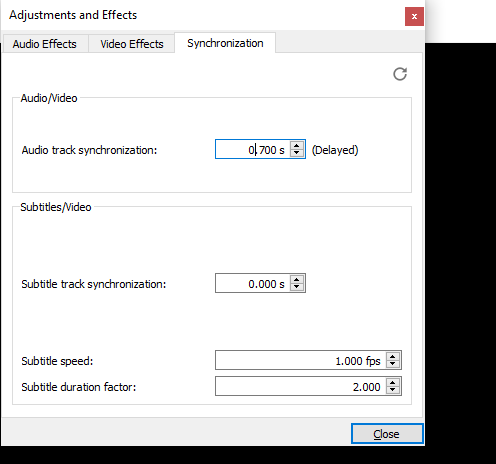
Fix 2: Set the Track Synchronization Value
Set Track Synchronization Value to fix Audio and video out of sync on MOV, AVI, MP4 file formats, etc.. Follow the below-mentioned steps to resolve the issue.
- Launch the video in VLC Media Player and select Tools → Effect and Filters.
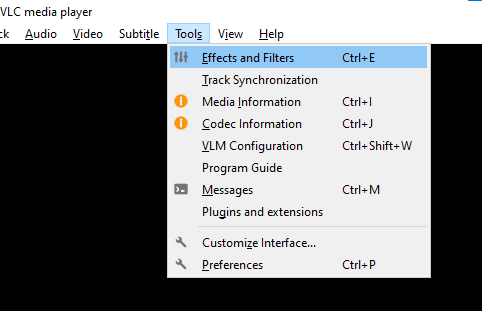
- Select on Synchronization tab.
- Set the Track Synchronization Value in the Audio/Video section; if you want to slow the Audio give the positive value, or if you’re going to match the Audio and video playing speed exactly, then you have to provide a negative value, and at the last click Close.
Fix 3: Permanently Set the VLC Audio Desynchronization
With this feature, you can permanently sync the Audio with the video. So if you open a video file with the Audio not syncing with the video issue, this method will fix the problem permanently. There is no need to do it for each video file repeatedly.
To make VLC Audio desynchronization permanent for all the error videos, you have to set the Audio Desynchronization Compensation value for one time. So, It will apply to all the Audio and video out-of-sync issues when you open in VLC. Given the steps below on how to set the Audio Desynchronization Compensation:
Step 1: Launch the VLC Media Player and access Tools → Preferences.
Step 2: Then go to the Audio section, and in the Show Settings, Select All; a screen will open on the right side. Give the Audio Desynchronization Value under the Audio
Step 3: E.g., if the Audio is playing for 2 seconds slowly, set the value to +2000 milliseconds. If the Audio is playing 2 seconds forward, set the value to -2000 milliseconds and click Save.
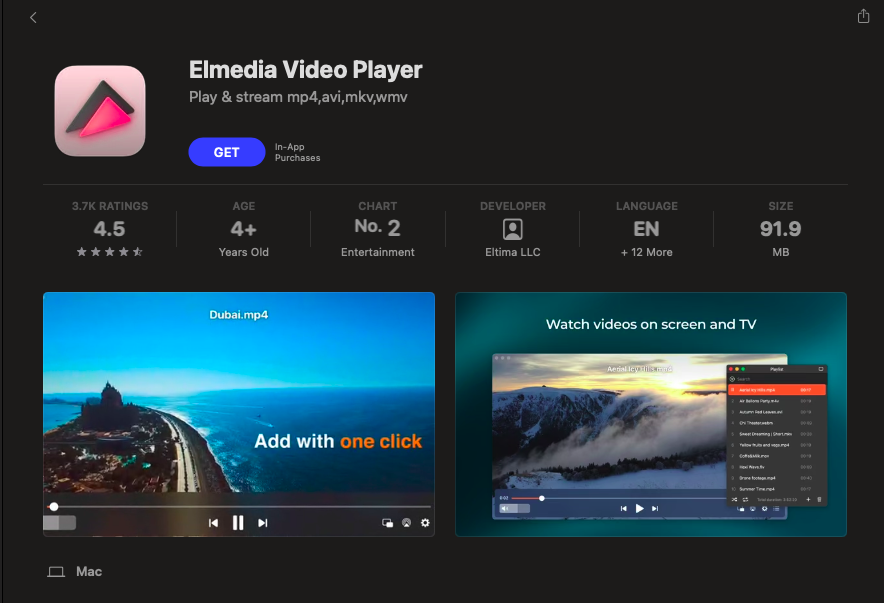
Method 6: Sync Audio and Video Using an Elmedia Player (Mac)
Sync audio and video errors by Elmedia Player and follow the steps below:
Step 1: Download and install the Elmedia Player and launch it to sync the audio and video issue.
Step 2: Play the video; if the Audio plays forward, click on the Audio, which is available on the menu bar, and then select Increase Audio Delay, or else you can use ⇧⌘[ hotkey.
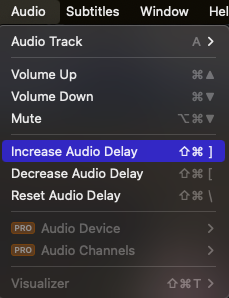
Step 3: If the Audio plays before the video, select Audio → Decrease Audio Delay or ⇧⌘] hotkey.
Method 7: Using Premiere Pro to Fix Audio and Video Sync Issues
Premiere Pro fixes audio video sync issues from Premiere Pro CC 2018(12.0.1) and the latest versions still now. Provided the steps to fix the Audio not syncing with the video.
Step 1: Open Adobe Premiere Pro>Create a Project and load the Variable Frame Rate video to the Project Panel.
Step 2: Launch the VFR visual and change it to the Effect Controls panel. Below the MPEG settings, you can switch from Preserve Audio Sync and Smooth Video Motion to VFR mode.
Step 3: Follow what Adobe Premiere Pro says and end the editing process.
Note: The Preserve Audio Sync will add or remove video frames to ensure that Audio and video never go out of sync, but Smooth Video Motion decodes all the frames in the video.
Method 8: Fix Audio not Syncing with Video by the Windows Media Player
Windows Media Player will fix the audio-video synchronization issue. Refer to the steps section to resolve the issue:
Step 1: Open the video file which is having the sync issue on Windows Media Player
Step 2: Select Organize → Options a Window will open; choose the Performance tab, go to Network Buffering, and give values from 1 to 10 by selecting the Buffer button.
Step 3: Below is a Video PlayBack; choose Drop Frames to Keep Audio and Video Synchronized and click OK.
Method 9: Make Use of Yodot Video Repair Software to Fix Audio-Video Out of Sync Issue
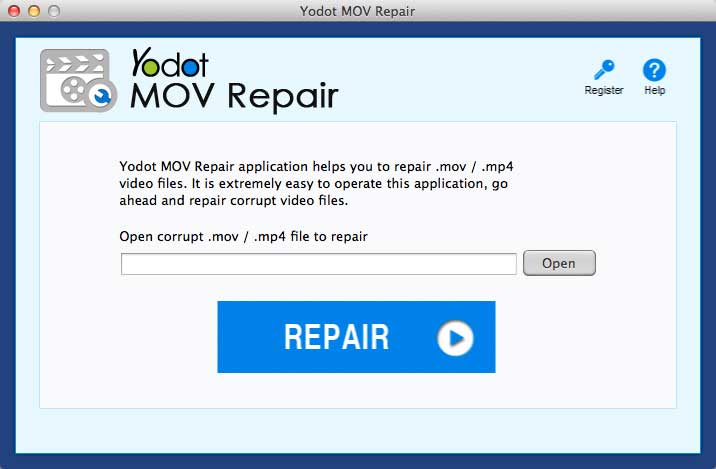
The Yodot Video Repair Software is a safe and reliable tool to fix your Audio not syncing with the video error in both Windows and Mac. This software is built with the latest algorithms to fix audio video sync issues and repair severely damaged or broken video, codec issues, header corruption, malware-infected video, etc., by supporting various video file formats like MOV, MP4, AVI, XVID, DIVX, etc. Download and Install the tool and follow the steps to fix the issue:
Step 1: Launch the Yodot Video Repair Software and click on Select File to select the video file with an audio-video sync issue.
Step 2: Provide a healthy MOV file if you have a MOV video file. If you have a different video file, provide a beneficial video file format and click on Repair.
Step 3: The tool will repair the video; after the repair process, you can preview the video by clicking on Preview.
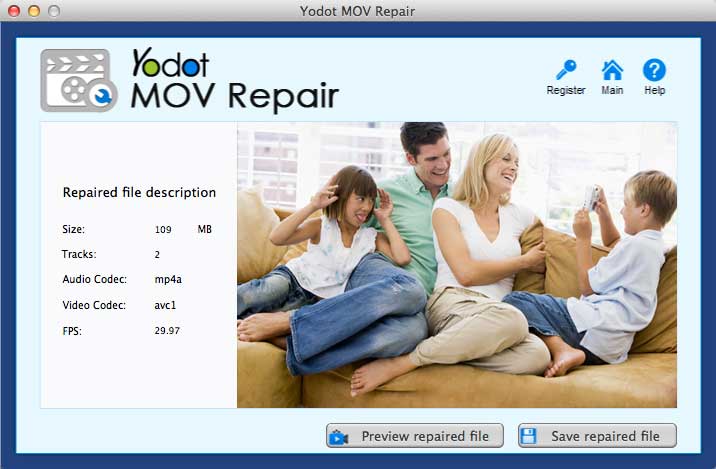
Step 4: Later, select Save to save the video file on your system.
Conclusion:
Here we have covered everything you want about the audio-video sync issue. So make use of this article effectively to fix the problem. And be worry-free; if you want an immediate solution to the audio video sync error, Yodot Video Repair Software is here to help you. Thanks for reading this article, and remember to share it with your friends!!
FAQ:
1. Why are my streaming video and Audio out of sync?
Encoder plays a prominent role in streaming Audio and video, but if the CPU tests the encoder heavily, audio-video sync issues occur. To avoid this issue, you have to check the system resources monitor once you plan to stream the Audio and video.
2. Why is youtube audio out of sync?
It is because of the variations in the audio and video track; if the Audio track is lengthier or shorter than the video track, a youtube audio out-of-sync error occurs.
3. Does CPU affect audio latency?
Plugin Delay Compensation – to produce good-quality results some plugins cause delays because of the huge processing required to produce that good-quality result. This can be noticed in more extensive sessions; a rare high-CPU device delays the audio output for the complete session.