Are you having problems connecting or syncing with your Outlook account? Are you receiving Outlook error 0x8004011d? The error might be similar to the below-mentioned message:
Error:
Microsoft Outlook 365 error (0x8004011D): ‘The server is not available. Contact your administrator if this condition persists.’
Task ‘Microsoft Exchange Server – Sending and Receiving ’ reported error ( 0x8004011D): ‘The server is not available. Contact your administrator if this condition persists.’

Table of Content:
What is Outlook Error 0x8004011d?
What are the Possible Reasons for the Error 0x8004011D in Outlook?
Quick Fixes for Outlook Error 0x8004011d
How Do I Fix Error 0x8004011d in Outlook?
It is no secret that Outlook is one of the most used email servers. However, just like any other application Outlook is not immune from errors.
‘Outlook error 0x8004011D’: It is a common error associated with Microsoft Outlook or Outlook – a client service that is part of Microsoft Office Suite. Usually, this error appears when you send or receive emails from Outlook App on your Windows computer.
Let’s look at the reasons and solutions for the error in the latter section of the article.
What is Outlook Error 0x8004011d?
When users try to connect or sync their Outlook accounts, they may receive an error – 0x8004011d, which indicates a synchronization problem. Outlook error 0x8004011d can be caused by a number of factors, including slow/interrupted internet connections, improper Outlook installation, etc.
What are the Possible Reasons for the Error 0x8004011D in Outlook?
Before getting into the solution it’s necessary to understand the reasons for the error.
- poor connectivity
- Faulty add-ins
- The server is down for maintenance or network issues
- Corrupt Outlook profile
- Damaged Outlook data file (OST)
- Certificate issue (HTTP/HTTPS)
- Exchange Database storing your mailbox on the server is dismounted or corrupt
Quick Fixes for Outlook Error 0x8004011d
These solutions might help you fix Outlook error 0x8004011d:
- Update Outlook to the latest version.
- Update the Windows Operating system.
- Run malware scan in safe mode.
How Do I Fix Error 0x8004011d in Outlook?
You can fix Outlook error 0x8004011d in multiple ways, here are some tested solutions:
- Check the Network Connection
- Check the Information Stores and Database
- Create a New Outlook Profile
- Enable the Cached Exchange Mode
- Perform an SFC Scan
- Rebuild Outlook Data File
- Repair an Outlook data file (.pst) file
- Repair OST File Using Yodot
Method 1: Check the Network Connection
When there is a problem with the network or connectivity with the mailbox server, it can result in a delay in sending messages, resulting in missing emails from Sent Items. Follow the below-mentioned steps to check if the internet is working and the mailbox server is available:
Step 1: Close Outlook applications and all other applications associated with it.
Step 2: Open the Outlook application or sign in to Office 365 Outlook.
Step 3: If you are unable to connect to the mailbox server, you may have to wait for a while as it may be down due to server maintenance or an outage.
On the other hand, if you can sign in successfully and access your email online, then the problem lies with the Outlook profile or the data file. You can learn about fixing the Outlook profile or the data file to solve the error 0x8004011d in the next section of the article.
Method 2: Check the Information Stores and Database
Note: If you do not have the required authority please contact your administrator to fix the issue using this method.
In order to check whether the information stored is mounted or not, you just need to follow the below-mentioned methods:
Steps to check whether the information stores are mounted or not:
Step 1: Go to Exchange Manager and click on the server > server Name, and click on First Storage Group in order.
Step 2: Now, Right-click on the Mailbox store to check the status. If it is dismounted, then you need to select the Mount Store.
Steps to check the database:
Step 3: Type C:/Program files/Exchsrvr bin/eseutil/mhmbdata/private1.edb. This will send the report of the database.
Step 4: If the status is Dirty, you need to make sure that all transaction logs from the checkpoint exist.
Step 5: Now, go to the Mount Store as mentioned in the above step.
Step 6: After this, you need to defrag the database by using Eseutil /d. Finally, run Information Store Integrity Checker Isinteg.exe.
Method 3: Create a New Outlook Profile
The Outlook error 0x8004011d is usually fixed by creating a new Outlook Profile. Follow the below steps to create a new profile.
Note: Take a backup of Outlook data before creating a new Outlook profile, since there are chances you might lose your existing data.
Step 1: Close Outlook applications and all other applications associated with it.
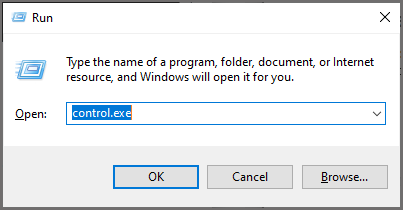
Step 2: Press the Window+R keys to open the Run dialog box
Step 3: Type control.exe and hit Enter.
Step 4: Type Mail in the search bar on the top right corner. Select the Mail app that appears in the results.

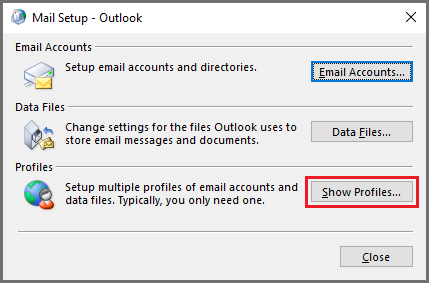
Step 5: Click on the Show Profile option.
Step 6: Select the existing Outlook profile you were using and click on the Remove option.
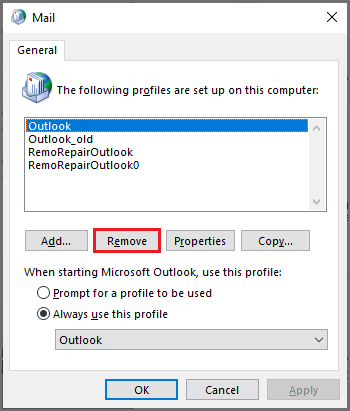
Step 7: Click yes to complete the procedure and restart your Outlook application.
Now, a new .ost/.pst file will be created automatically.
Method 4: Enable the Cached Exchange Mode
You might be able to fix the issue by enabling the cache exchange mode and checking if it connects to the server normally.
Step 1: Close Outlook applications and all other applications associated with it.
Step 2: Press the Window+R keys to open the Run dialog box and type control.exe and hit Enter.
Step 3: Type Mail in the search bar on the top right corner. Select the Mail app that appears in the results.
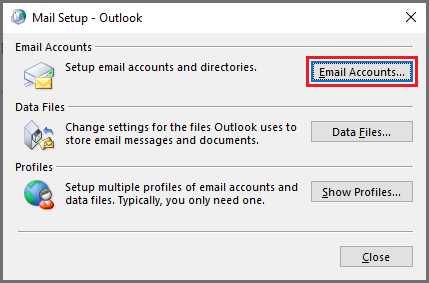
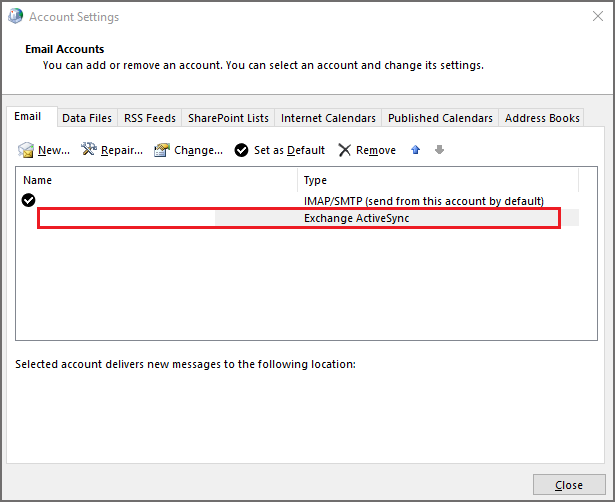
Step 4: Click on the Email Accounts option.
Step 5: Select the Exchange account you are using currently.
Step 6: Tick on Use Cached Exchange Mode.
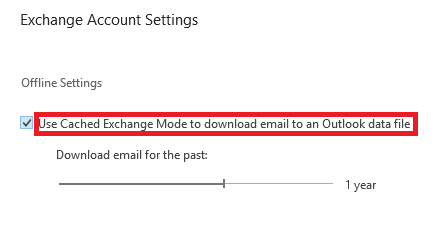
Step 6: Click on Apply.
Step 7: Click on OK.
Step 8: Close the MS Outlook application. Open the application again and check if the error still persists. If it does, check the next method.
Method 5: Perform an SFC Scan
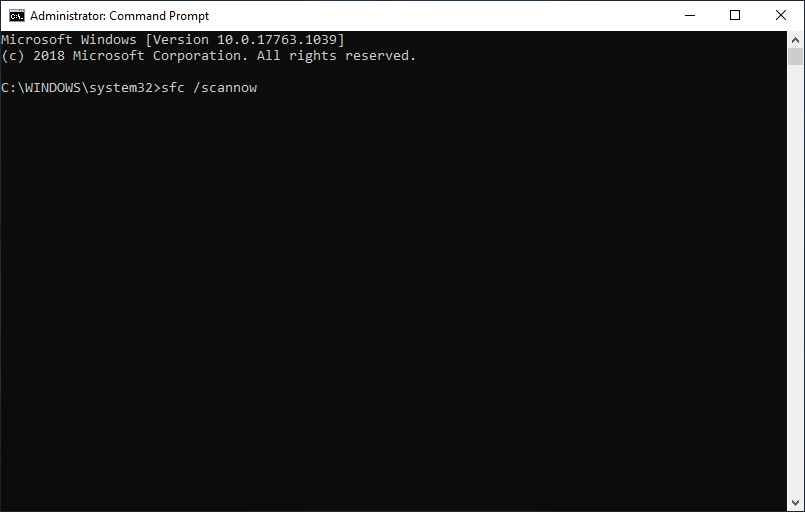
Step 1: Open the search box by pressing Windows + S and then type cmd.
Step 2: Right-click Command Prompt and choose Run as administrator.
Step 3: Type sfc /scannow and press Enter. Then, wait for a while.
Method 6: Rebuild Outlook Data File
If your Outlook OST data file is damaged, you can recreate it. This works when your profile is active. However, if your profile is disabled or removed from the server, the OST rebuild may fail.
The steps are as follows:
Step 1: Open Outlook, right-click on your profile, and click Open File Location.
Step 2: Copy and back up your OST file to another location.
Step 3: Now, close Outlook and then delete the default OST file.
Step 4: Restart Outlook. This will rebuild the OST file and sync all your mail items.
Try sending the email. The error should be fixed now. Also, check all your mail items. If sent items were not synchronized due to a problem with OST, you may encounter missing email items.
Method 7: Repair an Outlook data file (.pst) file
Step 1: Exit Outlook and browse to one of the following file locations:
- Outlook 2019: C:\Program Files (x86)\Microsoft Office\root\Office19
- Outlook 2016: C:\Program Files (x86)\Microsoft Office\root\Office16
- Outlook 2013: C:\Program Files (x86)\Microsoft Office\Office13
- Outlook 2010: C:\Program Files (x86)\Microsoft Office\Office10
- Outlook 2007: C:\Program Files (x86)\Microsoft Office\Office7
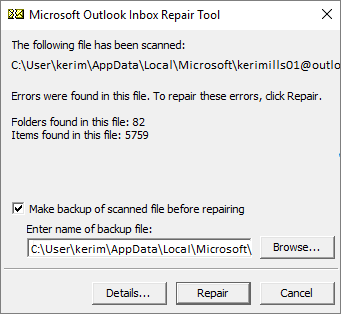
Step 2: Open SCANPST.EXE.
Step 3: Click on Browse to select the Outlook Data File (.pst) you want to scan. If you need help locating your Outlook Data File, see Locating the Outlook Data Files.
Note: By default, a new log file is created during the scan. You can choose Options and opt not to have a log created, or you can have the results appended to an existing log file.
Step 4: Choose Start to begin the scan.
Method 8: Repair OST File Using Yodot
If you have failed to resolve the Outlook error 0x800411d even after using the above solution then there might be a chance that your OST file is corrupt. If the synchronization process is interrupted during an Outlook upgrade, the OST file might get corrupted or damaged, which leads to this error.
In such cases, you can make use of the Yodot Outlook PST Repair tool to fix the damaged or corrupt OST file. This tool not only helps you to repair PST files but also repairs the OST file. Yodot Outlook PST Repair tool creates a backup of the corrupt OST files by converting them into a healthy PST file regardless of any reason behind the OST files being corrupted.