From the day Microsoft launched Windows 10, millions of users upgraded their OS to the latest edition of Windows. But, a few of the Windows users who have upgraded to Win 10 encountered an error message that states “Windows 10 couldn’t be installed. Windows can’t be installed because this PC has an unsupported disk layout for UEFI firmware” while downloading and installing Windows 10 Updates.
You cannot ignore this error since it prevents you from installing the Windows updates, as Windows updates are released to fix issues and increase system performance.
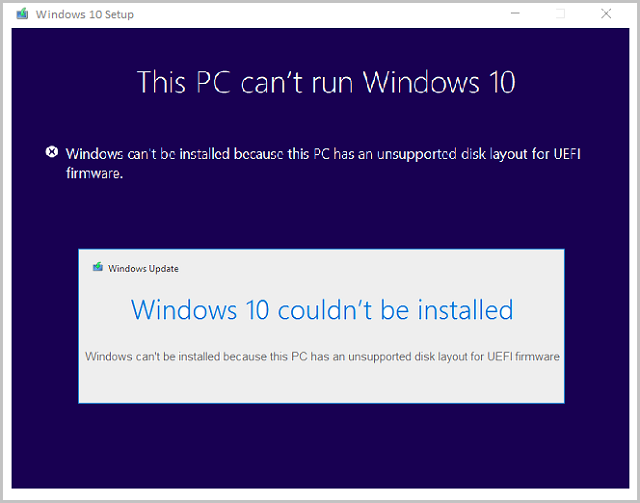
Where in some of the users come across another form of the same error message, “This PC can’t run Windows 10. Windows can’t be installed because this PC has an unsupported disk layout for UEFI firmware.” Hence they cannot install Windows 10 on the computer.
What Causes This PC to Have an Unsupported Disk Layout for UEFI Firmware Error?
Generally, this error message pops up on computers that are having both UEFI and BIOS firmware (hybrids). This is because the Windows 10 operating system or Windows 10 update cannot be installed/run on an MBR disk of a UEFI computer.
Even if you can successfully install Windows 10 on an MBR disk of the UEFI system, later you will be stuck at installing Windows 10 updates.
Thus, GPT and UEFI are directly associated with each just like your Windows 10 OS and Windows 10 updates. So, you can upgrade to Windows 10/install its updates only on a GPT hard disk of the UEFI firmware computer.
Step-by-Step Guidelines to Fix This PC Has an Unsupported Disk Layout for UEFI Firmware Error:
Caution: It is recommended to back up your important or entire data saved on the hard drive before you get started with the repair process. You can do this by simply creating an image file (System Image) of your hard disk and restoring it later when you have successfully fixed the error. If not, directly move required data or all of your files from the hard drive (HDD) to an external storage device like an external hard drive, SSD, or USB flash drive.
Method 1: Create an MSR Partition
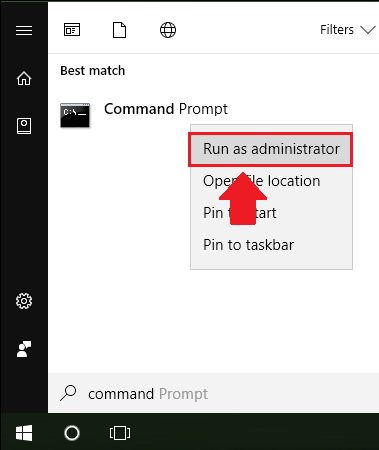
- OpenCommand Prompt as Administrator (from the Start menu search command prompt, right-click on command prompt, and select Run as administrator).
- Type diskpartand hit Enter button.
- Next, type list disk and press Enter.
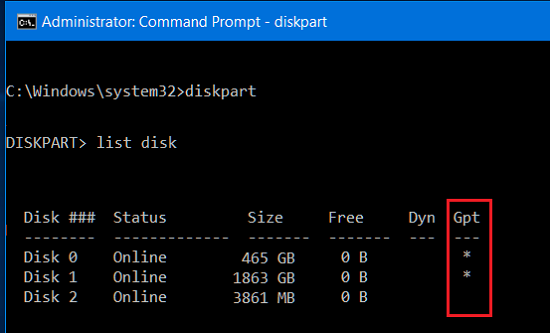
- Now, you will see all the disks connected to the system. If you see a * mark under GPT for your disk (on which you are trying to install Windows 10) then it is clear your system is using the GPT partition structure so, continue to create an MSR partition using the next instructions.
To create an MSR partition, type the below commands and press Enter after each:
- select disk D (replace D with the disk number on which you want to install Windows 10)
- List partition
- create partition msr size=128
- list partition
- exit
In case, you see nothing (no * mark) under the GPT of your disk then your hard drive should be converted into GPT format by clean installing Windows 10. If so, then directly jump to Method 2.
Be careful when using the Command Prompt to modify your hard disk partitions and structure. Since, there is no way for you to recover data from an accidentally deleted partition, from a hard drive with a missing partition table, after partition table corruption/damage, or to restore a lost partition from unallocated space of the hard drive other than using a data recovery program.
So, properly read the output, errors, or warnings you see on the Command Prompt editor window. Type each command carefully and wait till it gets completed. Then, type the next one.
Method 2: Clean and Install Windows 10
- Boot your system using a bootable Windows 10 DVD/USB
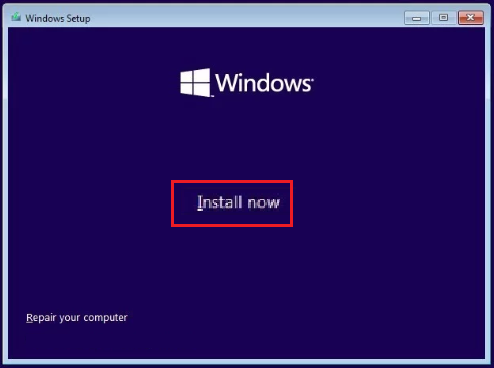
- Click the Install Now button
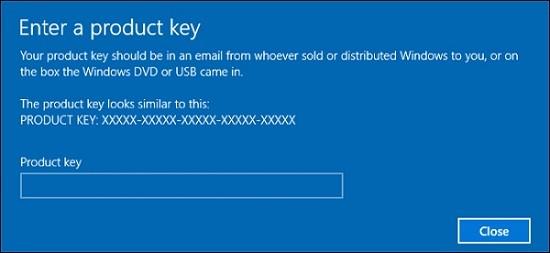
- Enter your Windows 10 license key (you can opt I don’t have a product key option if, you are reinstalling Windows 10)
- Select the version of Windows 10 you wish to install
- Check the checkbox I accept the license terms to agree and go to Next
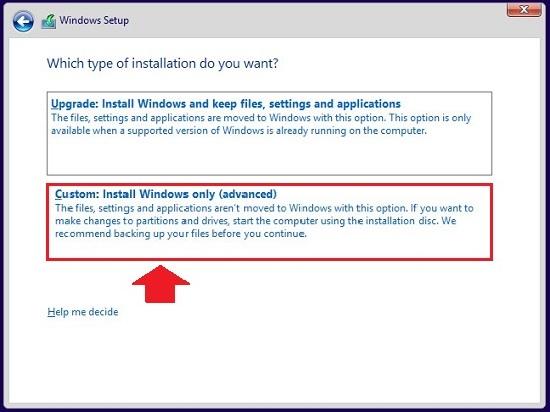
- Choose Custom: Install Windows only (advanced)
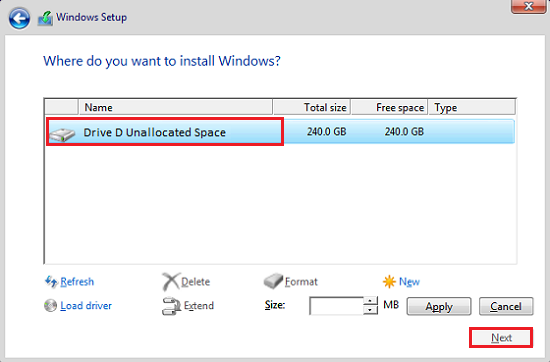
- In the “Where do you want to install Windows?” screen, select and Delete all previous partitions one by one
Now, your disk will be shown as Drive D Unallocated Space (your disk number will be present in place of D) along with its total size.
- Select Drive D Unallocated Space and click Next
Follow the on-screen instructions to clean and install Windows 10.
Windows will convert the unallocated space on your hard disk into partitions, and simultaneously the drive will be converted into GPT format. When you are successfully completed with the Windows 10 installation process, set up your account and finish configurations.