Even though Mac OS X is considered as one of the stable operating systems, sometimes, even normally functioning Mac machines may show up a sudden warning message that says “Mac hard drive exit code 8” or “file system check exit code is 8”. Resolving this Mac hard drive exit code 8 error message might become a tough job, especially when the user is not having an idea about what’s going on in the OS X machine.
What is the ‘File System Check Exit Code is 8’ Error?
‘The File system check exit code is 8’ or ‘Mac hard drive exit code 8’ errors occur mainly at the time of the system check and is capable of taking place in both internal and external hard drives.
‘The file system check exit code 8’ or ‘Mac hard drive exit code 8’ errors usually occur during the system check and can occur on internal and external drives.
What Are the Causes Behind Mac Hard Drive Exit Code 8?
File system check exit code 8/Mac hard drive exit code 8 error message may arise due to a number of reasons. And, here are a few listed:
- Improperly handling the Mac or installed applications on it
- Broken Mac file system, system files, or directories
- Incorrectly configured system settings
- Virus attack, malware, or spyware infection
- Downloading infected/suspicious files from the internet
- Presence of incompatible or outdated drivers/software
- Mac startup drive or directory is loaded with Junk files/programs
And, the list goes on….
How to Resolve Mac Hard Drive Exit Code 8?
Just as there are multiple causes of the “file system check exit code is 8” error, there are several solutions that may be used to fix it. Discussed below are some of the most effective methods you can use to fix it.
Method 1: Reboot Mac in Safe Mode
Many issues on OS X can be solved by a simple reboot, so reboot your Mac machine once. If this doesn’t help you, then reboot the Mac in Safe Mode.
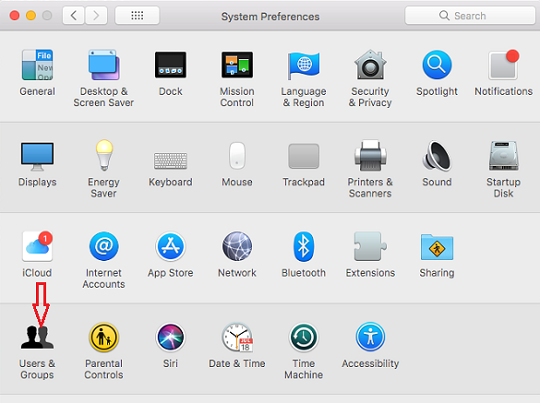
- If the “Mac hard drives exit code 8” error is fixed in Safe Mode, then check the startup and verify the login items; try clearing login items. To clear out startup login items,
- Go to System Preferences, and click Users & Groups.
- Select your account (on the left pane), and click the Login Items.
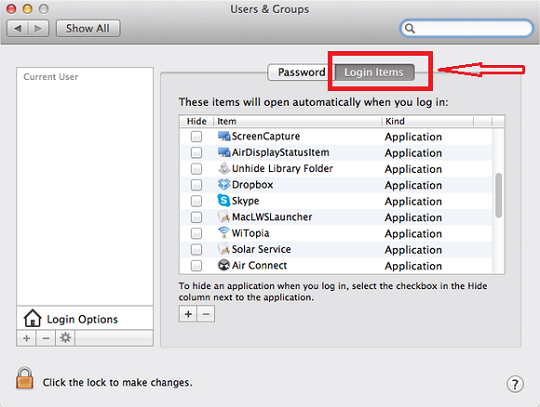
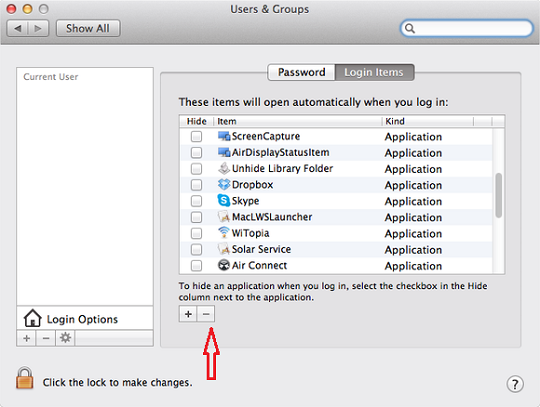
- Select the items to remove from the login list, and click the minus symbol.
- Reboot the Mac.
If the exit code 8 error is solved after the above troubleshooting, it clears that one of your login items is causing the error. So try loading each startup item and find the culprit.
Method 2: Get Rid of Temp, Cache, and Junk Files
It is a known fact that temp files, preferences, and cache are generated both by the Mac system and installed applications on it. When these files are not cleared often or they get corrupted, it results in various issues like system hang, application crash, or errors.
So, try clearing the cache (user cache, system cache, and browser cache), temp, and duplicate files from your Mac. To do this, there are several ways you can try like removing them manually or using third-party tools available on the internet.
In the meantime, don’t forget to empty the Trash bin of your Mac. When all set, restart the system to see if the Mac hard drive exit code 8 error is fixed.
Method 3: Run First Aid
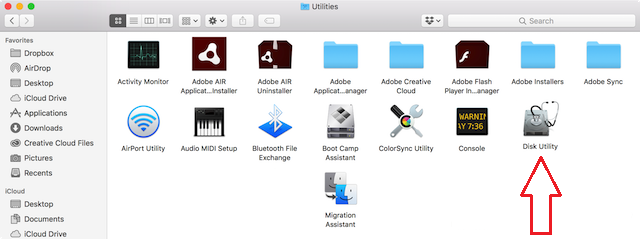
- Go to Applications > Utilities > Disk Utility.
- Select the corrupted drive and click First Aid on the top menu bar.
- Click Done and restart your Mac.
Method 4: Uninstall Faulty Applications
If you are encountering Mac hard drive exit code 8 only when you are using certain app programs, then it indicates the respective program is responsible for the error. To verify this, log in as another user (from another user account) and check, the same error emerges when using the same app.
When an application gets corrupted, becomes outdated, or is incompatible with your operating system or with other installed programs, a “Mac hard drive exit code 8” error may pop up while using the respective app. So, either you need to repair, or update the app to fix this error. Else, completely uninstall it and reinstall the new version of it.
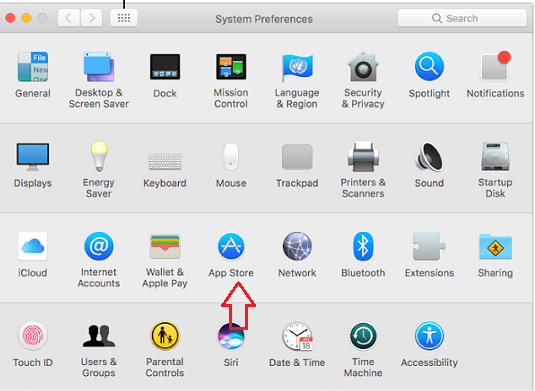
To upgrade your Mac system and apps installed on it to the latest version,
- Go to the Apple menu and select App Store.
- Click on the Updates button located on the top pane.
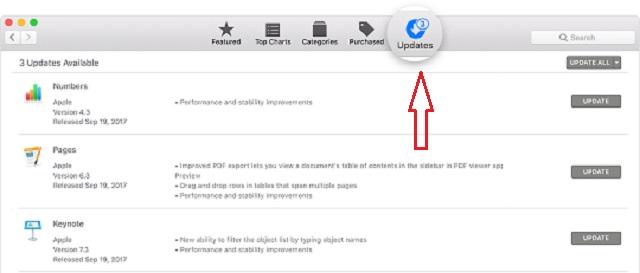
- Check available updates for your system and applications.
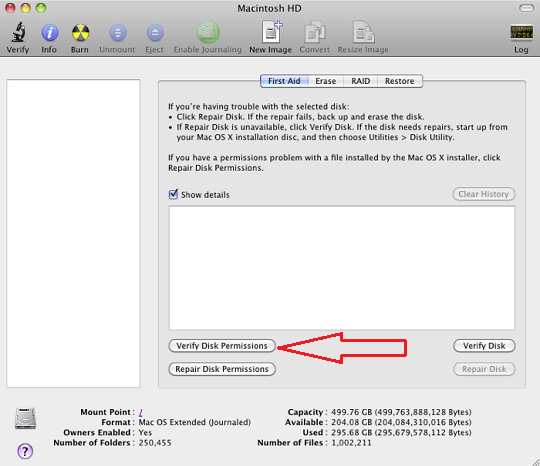
Method 5: Run Disk Utility
Disk permission issues are often responsible for many error codes including Mac hard drive exit code 8. So, you can use Mac’s inbuilt Disk Utility to check and fix the startup disk errors and issues.
And, here is how to run Disk Utility on your Mac:
- Launch Disk Utility from the Apple Applications and select the “Utilities” folder.
- Select your startup disk, and click on the First Aid button.
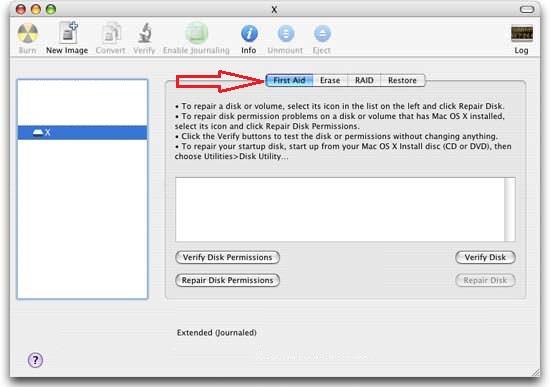
- Click the Repair Disk Permissions button to start the repair process.
Method 6: Use FSCK Command in Single User Mode
In Single User mode, run the file system consistency check (fsck) command to fix the corrupt file system on the troubled Mac storage drive. Follow the steps mentioned below:
- Press and hold the Command + S keys as soon as they start and release them when you see the text like-Mac boots in the Single User mode.
- Type the command /sbin/fsck – fy in the prompt and press Return. If the fsck repaired the corrupt drive, it shows: “File System Was Modified.”
- Repeat the above fsck command until it shows “The Volume (name) appears to be OK”.
- Restart your Mac normally.
Method 7: Re-Install Mac OS X
In case, if the “Mac hard drives exit code 8” error is caused by corrupt/missing, or damaged system files, do a reinstall of Mac OS X. To reinstall Mac OS X, follow the below procedure:
- Ensure, your Mac is connected to the Internet, then restart the Mac.
- After a reboot, it shows a gray screen. Now, hold down CMD + R keys.
- In the OS X “Utilities” dialogue box, click the Reinstall macOS button.
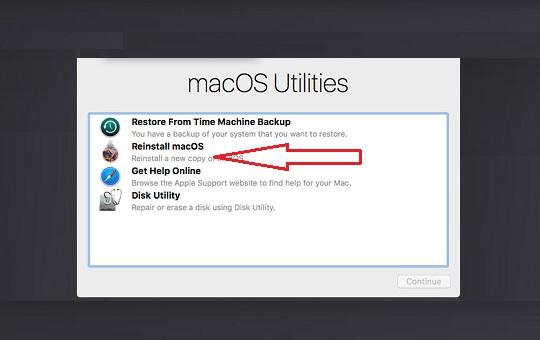
- Follow the on-screen instructions and complete the Mac OS X reinstallation process.
Data Recovery after Mac OS X Reinstall:
It is strictly suggested to take a backup of all your important files before you begin the macOS reinstall process. In case you failed to back up or any error occurs while backing up your files, then huge data loss is guaranteed. In such cases, you can recover your data after reinstalling macOS using Yodot Mac Data Recovery software. The software recovers lost data after reinstalling macOS or after upgrading from lower Mac versions to the latest Mac version. Moreover, the tool is compatible with all macOS including Ventura, Monterey, Big Sur, Catalina, High Sierra, Sierra, Mavericks, Yosemite, El Capitan, and earlier versions too. Download the free version of the software and get back your lost files before it’s too late.