Outlook stores its data in the form of an OST file if you’re using Office 365 or Exchange Accounts. This allows you to access previously downloaded emails, contacts, and calendars without the internet.
By default, this file is saved in the C: drive. But what if the OST file is large and there is limited space in your C: drive? In such cases, you might want to move the OST file to a different location for convenience.
Change location of OST file
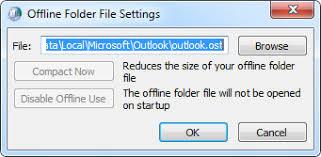
In older versions of Outlook, changing the location of the OST file is pretty straightforward, just use the Browse on the Outlook Data File Settings page and select a new location. However, in Outlook 2013 and 2016, the Browse button is disabled. To work around this problem, we provide some tips in this guide.
Workaround 1: Create a new Outlook profile and change the location of OST file
- As a first step, make a copy of the existing .ost file that you want to use
- Click on Windows + X to open power menu and select Control Panel
- Select Mail in the list of Control Panel items. If you don’t find it right away, type Mail in the search bar
- Click on Show Profiles > Add
- Assign a new name for the profile and click Ok
- Once the account is set up, click on Change Account Settings and click Next
- Click on More Settings in the Server Settings and click Finish
- Select the Advanced tab, click on Outlook Data File Settings and select Browse button to select the .ost file saved in Step 1. If you want to use a new .ost file, use the same ‘Browse’ button to select a new location to save your .ost file
- Click on Finish to complete setting up the account
- Finally, open Control Panel > Mail > Always use this profile and select the new profile that you just created.
Now with your new Outlook profile, the location of the OST file will be changed successfully.
Workaround 2: Change the registry settings
Note: This step involves making changes to the registry. Even a minor mistake in the process can damage your Outlook entirely. Hence, it is important that you follow the instructions carefully.
- Click on Windows + R keys to open the Run dialogue
- Type ‘regedit’ and hit Enter to open Registry Editor
- Once you open the Registry Editor, follow the path below
‘HKEY_CURRENT_USER \ Software \ Microsoft \ Office \ <Your Office version> \ Outlook’
- Right click on the folder named Outlook and click on New
- Then select Expandable String Value and type ‘ForceOSTPath’ and hit Enter
- Then right click on ‘ForceOSTPath’ and click Modify
- In the Value data field, enter the new location to save your OST file
- The close Registry editor and your OST file will be saved to a new location
Repair .ost files
If at any time, you encounter issues with your .ost file or if your Outlook is behaving abnormally, there are chances that the file is corrupt. If creating a new profile or other standard troubleshooting steps doesn’t work, you can fix .ost file by using Yodot’s OST to PST converter. Once the file is converted to PST, all attributes such as contacts, calendars, emails can be accessed easily. Refer convert OST file to PST for more details on the product and steps involved.
You can also use the converter when you need to import contents of the .ost file as .ost doesn’t offer import options. Download a trial and try it for free!