Microsoft developed a series of operating systems known as Windows Server (Windows Server 2012, Windows Server 2012 R2, Windows Server 2016, Windows Server 2019, Windows Server 2022, etc), designed specifically for server maintenance.
Windows Server is a specialized operating system that manages and controls computer networks for businesses and organizations. It provides essential services such as file storage, user management, application hosting, and network security. It aims to ensure smooth communication and collaboration between computers and users within a networked environment, making work more efficient and secure.
Hence, if your files from Windows Server get deleted, it becomes quite a hassle. Even if a single file is lost from your Windows server it can affect the entire chain of devices connected to that server. Even in such a dire situation, we can help you recover your deleted files.
How do Windows Server Files get Deleted?
File Deletion and data loss are a common occurrence that can happen to anyone. Understanding the causes behind it is essential for preventing such incidents in the future. By recognizing the factors that lead to file deletion, you can take measures to avoid these incidents and minimize the risk of losing essential data.
Common Scenarios Leading to File Deletion on Windows Server:

- Disk or storage failures: Hardware failures, such as hard disk failures or issues with the server’s storage subsystem, can result in data loss, including file deletion. If a disk fails or becomes corrupted, it may require data recovery efforts.
-
- Accidental Deletion: Human errors are one of the most common causes of file deletion. Users, including administrators, can accidentally delete files or folders while performing various tasks on the server.
-
- System Errors: Software bugs, system crashes, or issues with file management tools can sometimes lead to unintended file deletions. For example, a malfunctioning application or script may delete files unintentionally.
-
- File system issues: File system errors, corruption, or inconsistencies can occur due to various factors, including power outages, improper shutdowns, or software conflicts. In some cases, these issues can result in the loss or deletion of files.
It’s essential to have good ways to back up and restore your files, like making copies regularly and controlling who can access them. This reduces the chances of losing your files by mistake and make sure you can get them back if something goes wrong. So let’s move forward to recover deleted files using the DIY method mentioned below.
Methods to Recover Deleted Files from Windows Server
Whether you are using Windows Server 2003, 2008, 2012, 2012 R2, 2016, 2019, 2022, or any other server, deleted files or folders from your Windows server system are recoverable, but acting quickly is essential. Deleted files can be overwritten or expire over time, making recovery more complex. Initiate the recovery process to maximize the chances of success.
Method 1: Recover Windows Server Files from the Recycle Bin
Always check your recycle bin when you realize that some of your important files or folders are lost. Act Fast, as the data will be removed from the Recycle bin after 30 days.
Step 1: Open the Recycle bin

Step 2: Select the files you want to recover. Press and hold the Ctrl key if you want to select multiple items.
Step 3: After all files are selected Right click on any of the selected files.
Step 4: Click the Restore option from the right-click menu.
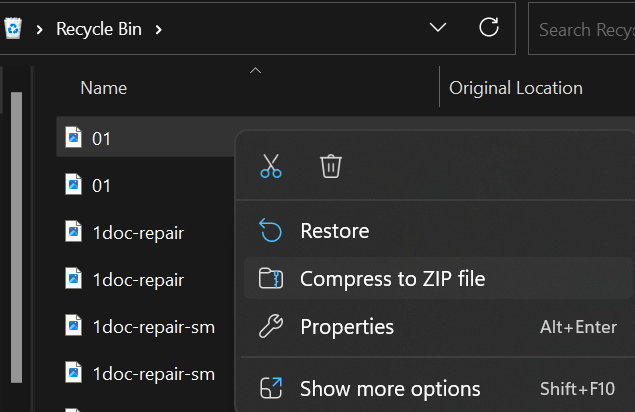
Step 5: The selected files will be restored to their original locations on the server.
Method 2: Restore Windows Server Deleted Files Using the Previous Version Option
Suppose you know what the previous versions’ feature is and have activated restore points earlier. In that case, this solution will help you recover files from Windows Server OS.
Step 1: Open File Explorer. Navigate to the location where the lost file was initially stored.
Step 2: Right-click on the folder or directory and select the Properties option.
Step 3: Click on the Previous Versions tab in the Properties window.
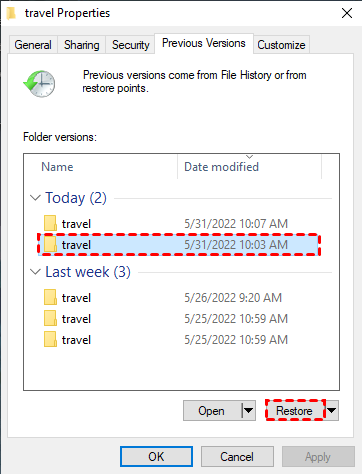
Step 4: Select the most recent or relevant previous version that may contain the deleted file.
Step 5: Click on the Restore button to recover the selected previous version.
By following these steps, you can successfully retrieve a previous version of the deleted file from the Windows Server. But, note that the restored file will not have data changes made since the previous version was used for recovery.
Method 3: Restore Deleted Files from a Backup
If you have created a backup of the files and folders you can recover your data using this.
The following method can only be used in case you have created a backup and have access to the backup media or drive. Follow the steps below to restore data from a backup on your Windows Server PC.
Step 1: Click on the Windows button. Select the Control Panel.
Step 2: Select System and Maintenance.
Step 3: Select Backup and Restore.
Step 4: Click on Restore my files.
Step 5: Follow the steps in the new popup window.
Step 6: After completion verify that the recovered files are now available in the designated location on the Windows Server.
Suppose you don’t have an accessible backup or you don’t have a previous version option. In that case, you can always utilize data recovery tools like Yodot.
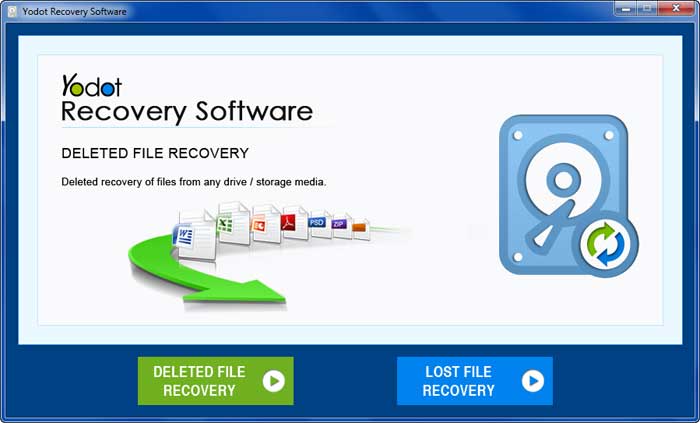
Method 4: Utilize Yodot File Recovery software to Recover Deleted Files from Windows Server [2016/2019/2022 etc.]
Yodot File Recovery is a remarkable tool for recovering data from Windows Server systems. It performs a thorough scan of the chosen storage media, enabling the recovery of various file types such as MS Office files, songs, videos, movies, and text files. This professional software can recover deleted or lost, folders and files from the Windows Server Operating System.
Here are the steps to perform deleted file recovery from Windows Server using Yodot File Recovery software:
Step 1: Download and install Yodot File Recovery, and run the application.
Step 2: Select the Deleted File Recovery option to recover your deleted files from Windows Server.
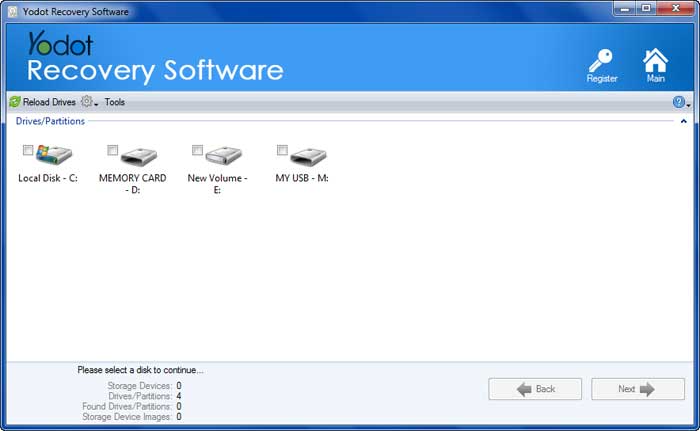
Step 3: The application scans and shows all the drives on the computer. Select the source drive from where files or folders got deleted and press the Next button.
.
Step 4: The application scans and shows all the deleted files from your selected drive.
Step 5: After the scanning finishes, you can click the Preview option to view the files before saving them.

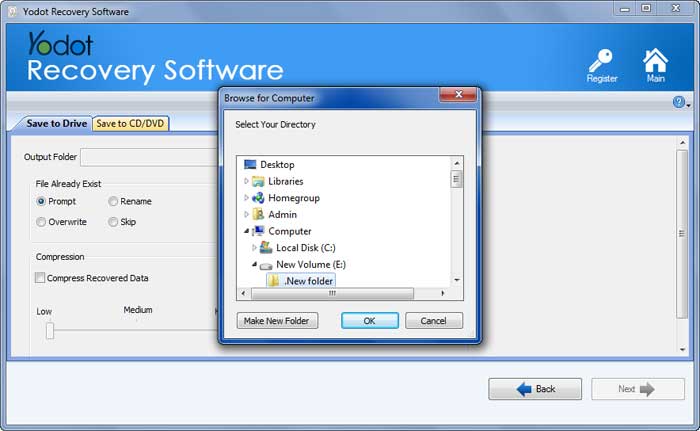
Step 6: Select the deleted files and folders you wish to recover, then click the Save button. You can browse to select the destination where you want to save your recovered files.
According to Megaleecher.Net: “Yodot File Recovery Software: The Best Cure for Data Loss” –
Yodot file recovery software for Windows has gained trust and recognition across the globe. It offers a great platform for both technical and non-technical users such that they can easily recover files with a sense of simplicity. The combined efforts of the technical team, proficient developers, researchers, tech experts, and support team have let the Yodot utilities spread widely.

Tips to Avoid Data Loss on a Windows Server
To prevent data loss on a Windows Server, consider implementing the following reasons given below:
-
- Regular Backups: Create a regular backup to ensure that essential data on the Windows server is backed up on a scheduled basis. This can include full, incremental, or differential backups, depending on your specific needs.
-
- Security Measures: To avoid unauthorized access to your server, use strong passwords, implement access controls, and regularly update security patches and antivirus software to prevent data loss.
-
- Regular Maintenance: Perform regular server maintenance tasks like disk cleanup, defragmentation, and system updates to optimize performance and reduce data loss risks.
Conclusion
This article discussed the process of recovering permanently deleted data files on a Windows server. Whether the deletion was accidental or intentional, it is essential to use reliable methods for recovery. Therefore, we have provided reliable solutions to recover deleted server files.
Frequently Asked Questions:
The time required for Windows server file recovery depends on various factors such as what version of OS you are using, the size of the lost data, the number of files to be recovered, and the reason behind data loss from the server.
If you remove a file from your Windows Server system, it goes to the Recycle Bin. But this is not always the case and can vary depending upon the Recycle Bin settings.