In the current era, most of us use iMovie to edit all types of videos, from long YouTube videos to short TikToks. In capturing your moments in real-time and editing them with tools such as iMovie on Mac or Camtasia, for example, it makes sense to do so. Mac OSX devices come preinstalled with iMovie, which has cross-compatibility with more powerful video editing platforms such as Premiere Pro.

Since iMovie is a Mac application and MP4 is a universal format, you might want to export iMovie to MP4. Mp4 is supported by most of the media players and can be easily accessed on various devices and platforms such as Instagram, Facebook, Twitter, Mac, iOS, Android, Windows.
So, it is advantageous to convert/export iMovie to MP4. This article will help you export iMovie to MP4 easily and learn how to fix issues wherein iMovie doesn’t work properly or freezes. Let’s start by understanding why should one export iMovie to MP4.
Why Export iMovie to MP4?
MP4 is a highly recognized video standard that is majorly preferred by users all over the world. This video format is highly suitable for video streaming over the internet which has become the main platform for accessing or streaming videos. As MP4 is more internet-friendly when compared to other popular video formats like MOV, AVI, FLV, etc. the conversion becomes inevitable.
MP4 videos are highly compressed using different procedures with less loss of quality and it is supported by media players like VLC, Apple’s QuickTime player, Microsoft’s Windows media player, and many more.
Can I convert iMovie to MP4?
Yes, iMovie files can be converted to MP4. Fortunately, if you are a Mac or an iOS user, you might not be aware of the fact that iMovie can be used to export .mov to .mp4. So this write-up will help you understand how to convert iMovie to MP4.
How to Export a QuickTime file from iMovie to MP4 on Mac?
Follow the steps given to Export iMovie to MP4 easily:
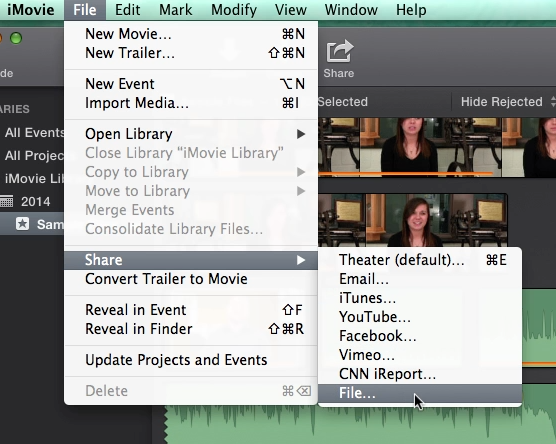
1. Open the iMovie app and select a video file in the browser.
2. Click on the Share option available in the Toolbar, and then click the File option.
3. Then a dialog box will appear, in which you can change Title, Description, Tags, Format, Resolution, Quality, and Compress. You can do any of the following changes:
- To set the title of the shared movie: Click on the Name at the top and enter the new name.
- Set the description of the shared movie: Click on the Description field and enter the new text.
- To set tags for the shared movie: Click on the Tags field and enter tag names.
- To set the output format of the shared movie: Click on the Format pop-up menu and choose the appropriate option. [You can choose to export video + audio or just an audio file.]
- Set the resolution of the shared movie: Click on the Resolution pop-up menu and choose the appropriate option.
- To set the output quality of the shared movie: Click on the Quality pop-up menu and choose the appropriate option.
- To choose a compression setting: Click on the Compress pop-up menu and choose the appropriate option.
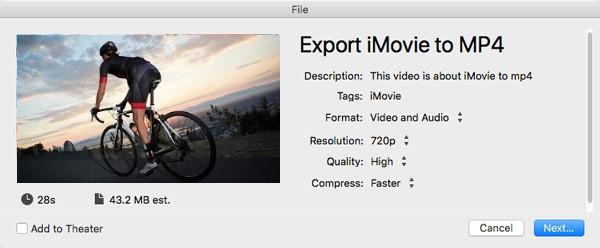
(Note: To export iMovie to MP4, select Low or Medium or High in the Quality option given in the Dialog box. Learn why in the following sections.)
- Low Quality is preferred for uploading a video on YouTube
- Medium Quality is preferred when you don’t want to compromise on the quality of your video created
- High Quality is preferred to create a movie
4. Make the required changes and click Next.
5. Change the name or leave the default name of (movie or trailer or clip) in the Save As File option.
6. Select the location of your choice and then click Save.
You can see a progress indicator on the right side of the Toolbar, which disappears after the process gets completed.
Also Read: Why do videos on my iPhone have no audio?
Convert MOV to MP4 using QuickTime
QuickTime player is owned and developed by Apple Inc., which supports various video formats, image formats, audio formats, etc. The Quick Time media player is known for its diversified functions. But unfortunately, you cannot export .mov to MP4 using Quick Time Player. Instead, you need to use QuickTime Pro which is a paid version of QuickTime player to convert MOV to MP4.
Steps to convert MOV to MP4 Mac using QuickTime Pro:
1. Select the File option in the Toolbar.
2. Select Open File to browse and choose MOV files present to convert MOV to MP4 on your Mac.
3. Once you add the .mov files successfully, the option of Export from the drop-down menu will be activated. Select it to move on to the next screen.
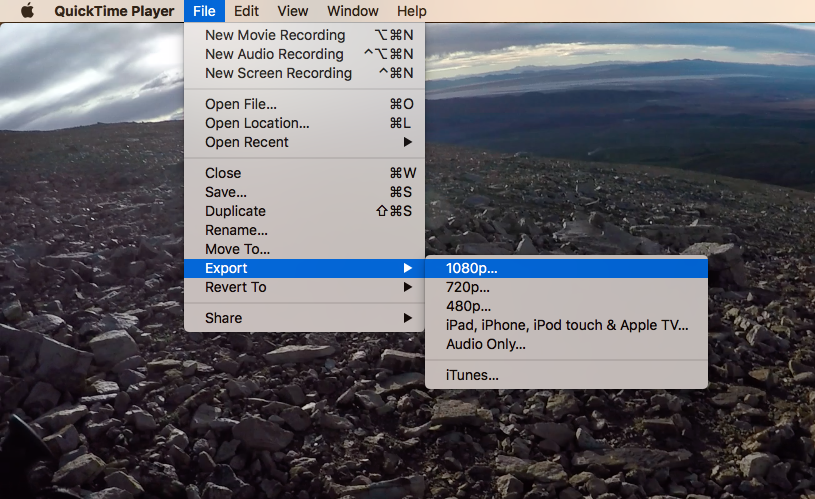
4. You will see the Export panel will display a list of options, select the Movie to MPEG-4 option from the list.
5. Click Save to allow QuickTime Pro to export files to MP4.
How To Convert iMovie To MP4 On Windows?
To export iMovie to MP4 on Windows, you have to use online converters that are totally free. Although there are limitations on the size of the video you can convert, you can use some online tools like Zamzar and many others.
To export iMovie to MP4 on Windows using an online converter, follow the steps below:
- Launch Your Browser and search for the free online converter. (select any one of the following converters and proceed with the next steps)
- Click on Add Files and add the video you want to export iMovie to the MP4. (This can also be done through the drag and drop option)
- Next, edit options for the conversion by choosing MP4 as the output file.
- Then, click the Convert Now option.
- Wait for the conversion process to complete and click Download.
How To Export iMovie To MP4 On iPhone?
So, to export iMovie to MP4 On iPhone, follow the steps below:
- Firstly, open the iMovie app on your iPhone.
- Then, add your project and edit it. Once you are done, click on the Done on the upper-left corner.
- Tap on the video you want to export.
- Press the Share button and click on Export Project.
- Click on the Save to Files option and press My iPhone.
- Now, click Save again and then click on the X button .
By following the above-mentioned steps, you will be able to convert iMovie to MP4 successfully. Due to the fact that converting a video involves changing the file structure and then reassigning video content, there is the possibility of corrupting the video. This corruption might not be restricted to the source .mov file, it can also happen with the converted .mp4 file.
For instance, if you are converting the .mov file project to .mp4 video format, there are certain chances that either of your files may get corrupt due to the sudden interruptions during the MP4 conversion like power failure, computer restart, computer shut down, etc.
Fortunately, Yodot MOV Repair software comes in handy in such situations and can easily fix corrupted MOV and MP4 files in just a few steps. This tool supports Mac and Windows operating systems.
Conclusion:
Hoping that the article has answered how to convert .mov videos to .mp4 videos using iMovie and QuickTime Pro. But as you know that MOV files or MP4 files might get corrupted for certain reasons, use Yodot MOV Repair Tool for safe and secure iMovie exporting.